고정 헤더 영역
상세 컨텐츠
본문

CI/CD 개요
CI/CD는 소프트웨어 개발 프로세스를 자동화하여 코드 변경 사항이 신속하고 안정적으로 사용자에게 전달되도록 하는 방법론입니다. 이를 통해 개발자는 코드 변경을 중앙 저장소에 빈번하게 통합하고, 자동화된 빌드와 테스트를 수행하여 코드의 품질을 유지하며 배포 과정을 자동화하여 사용자에게 빠르게 소프트웨어를 제공할 수 있습니다.
CI (지속적 통합, Continuous Integration)
여러 명의 개발자가 협업할 때 소스 코드 변경 사항을 자주 통합하며, 이 변경 사항이 문제가 없는지 자동으로 빌드(build)하고 테스트(test)하는 과정을 말합니다.
이를 통해 코드의 품질을 유지하고, 충돌이나 오류를 조기에 발견하여 빠르게 수정할 수 있습니다.
CD (지속적 제공/배포, Continuous Delivery / Continuous Deployment)
CI 이후의 단계에서 테스트가 완료된 애플리케이션을 사용자 환경에 배포하는 과정을 자동화하며 크게 두가지로 나뉩니다.
- 지속적 제공 (Continuous Delivery)**는 CI 이후의 애플리케이션을 배포 가능한 상태로 유지하며, 실제 배포는 수동으로 진행
- 지속적 배포 (Continuous Deployment)**는 테스트까지 통과한 애플리케이션을 자동으로 프로덕션 환경에 배포
자주 사용되는 도구
| 예시 | 역할 | 설명 |
| GitHub, GitLab, Bitbucket 등 | 소스 코드 저장소 | - 소스 코드 변경 사항을 저장소에 푸시(push) |
| Jenkins, GitHub Actions, GitLab CI 등 | CI 도구 | - 소스코드 가져오고 품질 검사 및 테스트 - Dockerfile 기반으로 컨테이너 이미지 빌드 및 이미지 저장소에 업로드 |
| Docker Hub, Amazon ECR 등 | 컨테이너 이미지 저장소 | - CI 도구가 빌드한 컨테이너 이미지를 저장 - k8s는 이 저장소에서 이미지를 가져와 배포 |
| Argo CD, Flux, Spinnaker 등 | CD 도구 | - k8s 배포 매니페스트를 기준으로 클러스터 상태를 자동으로 동기화 - 새로운 이미지 버전이나 설정 변경이 Git에 반영되면 이를 감지하여 k8s에 자동으로 배포 |
Jenkins CI + K8S(Kind)
본 내용은 kind로 k8s가 설치되어 있고, docker network(kind)가 생성된 상태입니다. 해당 네트워크에는 Jenkins와 Gogs 컨테이너가 각각 구성되어 있으며, 서비스 간 통신이 가능한 환경입니다.
필요사항
- jenkins
- gogs
- 계정 및 Token
- docker hub
- 계정 및 Token
Gogs 저장소 설정
# (옵션) GIT 인증 정보 초기화
# git credential-cache exit

# Git 설정값 확인
git config --list --show-origin

# 변수 설정
TOKEN=<각자 Gogs Token>
MyIP=<각자 자신의 PC IP> # Windows (WSL2) 사용자는 자신의 WSL2 Ubuntu eth0 IP 입력 할 것!

# dev-app 저장소를 로컬로 복제
git clone http://devops:$TOKEN@$MyIP:3000/devops/dev-app.git
# Cloning into 'dev-app'...
# ...

#
cd dev-app

# 현재 로컬 저장소의 Git 설정값 확인
git --no-pager config --local --list
# 사용자 이름 설정
git config --local user.name "devops"
# 사용자 이메일 설정
git config --local user.email "a@a.com"
# 기본 브랜치 이름을 main으로 설정
git config --local init.defaultBranch main
# 자격 증명 저장 방식 설정 (store: 평문 저장)
git config --local credential.helper store
# 변경된 로컬 설정값 다시 확인
git --no-pager config --local --list
# 실제 .git/config 파일 내용 확인
cat .git/config

# 현재 로컬 저장소의 브랜치 목록 확인
git --no-pager branch
# 연결된 원격 저장소 정보 확인 (URL 포함)
git remote -v

# (참고) 현재 브랜치가 master일 경우 main으로 변경
# git branch -m master main
# server.py 파일 작성
cat > server.py <<EOF
from http.server import ThreadingHTTPServer, BaseHTTPRequestHandler
from datetime import datetime
import socket
class RequestHandler(BaseHTTPRequestHandler):
def do_GET(self):
match self.path:
case '/':
now = datetime.now()
hostname = socket.gethostname()
response_string = now.strftime("The time is %-I:%M:%S %p, VERSION 0.0.1\n")
response_string += f"Server hostname: {hostname}\n"
self.respond_with(200, response_string)
case '/healthz':
self.respond_with(200, "Healthy")
case _:
self.respond_with(404, "Not Found")
def respond_with(self, status_code: int, content: str) -> None:
self.send_response(status_code)
self.send_header('Content-type', 'text/plain')
self.end_headers()
self.wfile.write(bytes(content, "utf-8"))
def startServer():
try:
server = ThreadingHTTPServer(('', 80), RequestHandler)
print("Listening on " + ":".join(map(str, server.server_address)))
server.serve_forever()
except KeyboardInterrupt:
server.shutdown()
if __name__== "__main__":
startServer()
EOF# Dockerfile 생성
cat > Dockerfile <<EOF
FROM python:3.12
ENV PYTHONUNBUFFERED 1
COPY . /app
WORKDIR /app
CMD python3 server.py
EOF
# VERSION 파일 생성
echo "0.0.1" > VERSION# 현재 디렉토리 구조 확인
tree
# Git 변경 사항 확인
git status
# 변경된 모든 파일 스테이징
git add .
# 변경사항 커밋
git commit -m "Add dev-app"
# main 브랜치로 커밋 푸시 (원격 브랜치와 연결)
git push -u origin main

Jenkin
▷ Jenkins Plugin 설치
Dashboard → Jenkins 관리 → Plugins → Available plugins
| Plugin | 설명 |
| Pipeline Stage View | 파이프라인의 각 단계를 시각적으로 표현하여 빌드 진행 상황과 실패 지점을 명확하게 확인할 수 있도록 함 |
| Docker Pipeline |
Jenkins 파이프라인 스크립트 내에서 Docker 이미지 빌드 및 푸시 작업을 사용할 수 있도록 지원함 |
| Gogs |
Gogs 저장소와 Jenkins를 연동하여 코드 푸시 시 자동으로 빌드가 트리거되도록 설정할 수 있도록 함 |
▷ Jenkins Item 생성
Dashboard → 새로운 Item → Pipeline
# Definition : Pipeline script
pipeline {
agent any
environment {
DOCKER_IMAGE = '<자신의 도커 허브 계정>/dev-app' // Docker 이미지 이름
}
stages {
stage('Checkout') {
steps {
git branch: 'main',
url: 'http://<자신의 집 IP>:3000/devops/dev-app.git', // Git에서 코드 체크아웃
credentialsId: 'gogs-crd' // Credentials ID
}
}
stage('Read VERSION') {
steps {
script {
// VERSION 파일 읽기
def version = readFile('VERSION').trim()
echo "Version found: ${version}"
// 환경 변수 설정
env.DOCKER_TAG = version
}
}
}
stage('Docker Build and Push') {
steps {
script {
docker.withRegistry('https://index.docker.io/v1/', 'dockerhub-crd') {
// DOCKER_TAG 사용
def appImage = docker.build("${DOCKER_IMAGE}:${DOCKER_TAG}")
appImage.push()
appImage.push("latest")
}
}
}
}
}
post {
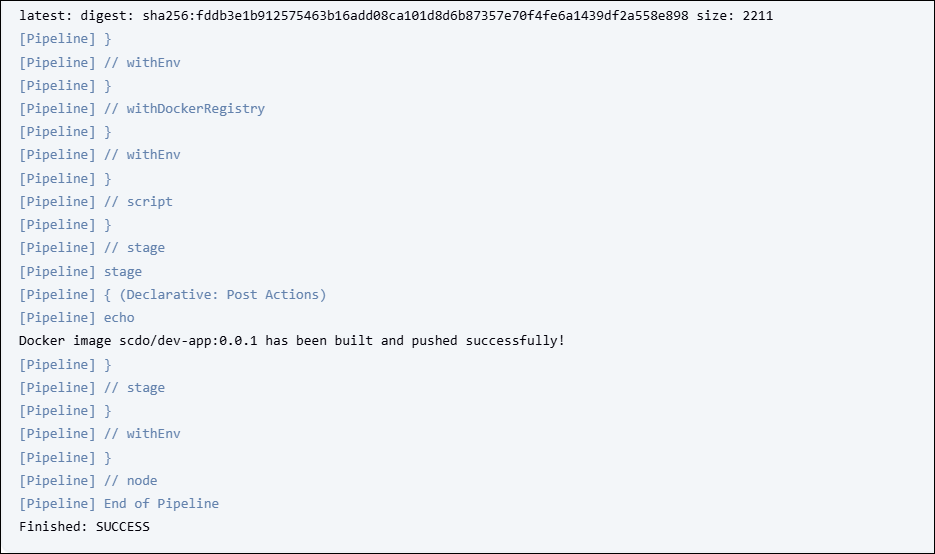
success {
echo "Docker image ${DOCKER_IMAGE}:${DOCKER_TAG} has been built and pushed successfully!"
}
failure {
echo "Pipeline failed. Please check the logs."
}
}
}
k8s에 애플리케이션 배포
k8s는 선언형 구성 방식인 declarative configuration 방식을 기반으로 작동하며 사용자가 원하는 상태를 설정 파일에 정의하면 해당 설정을 클러스터에 적용한 뒤 실제 상태를 그에 맞추기 위해 지속적으로 조정합니다. 이러한 방식으로 k8s는 항상 사용자가 정의한 상태를 만족하도록 유지하려고 합니다.
# Docker Hub에서 이미지 가져오기
# 디플로이먼트 오브젝트 배포 : 리플리카(파드 2개), 컨테이너 이미지 >> 아래 도커 계정 부분만 변경해서 배포해보자
cat <<EOF | kubectl apply -f -
apiVersion: apps/v1
kind: Deployment
metadata:
  name: timeserver
spec:
  replicas: 2
  selector:
    matchLabels:
      pod: timeserver-pod
  template:
    metadata:
      labels:
        pod: timeserver-pod
    spec:
      containers:
      - name: timeserver-container
        image: docker.io/$DHUSER/dev-app:0.0.1
        livenessProbe:
          initialDelaySeconds: 30
          periodSeconds: 30
          httpGet:
            path: /healthz
            port: 80
            scheme: HTTP
          timeoutSeconds: 5
          failureThreshold: 3
          successThreshold: 1
EOF
# 다른 터미널에서
watch -d kubectl get deploy,rs,pod -o wide
# 배포 상태 확인 : kube-ops-view 웹 확인
kubectl get events -w --sort-by '.lastTimestamp'
kubectl get deploy,pod -o wide
kubectl describe pod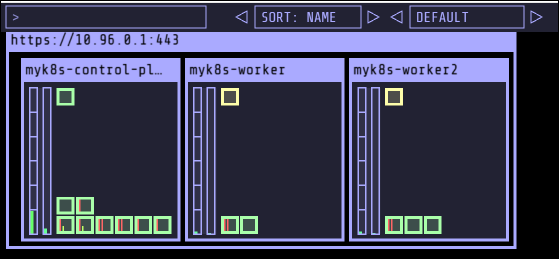

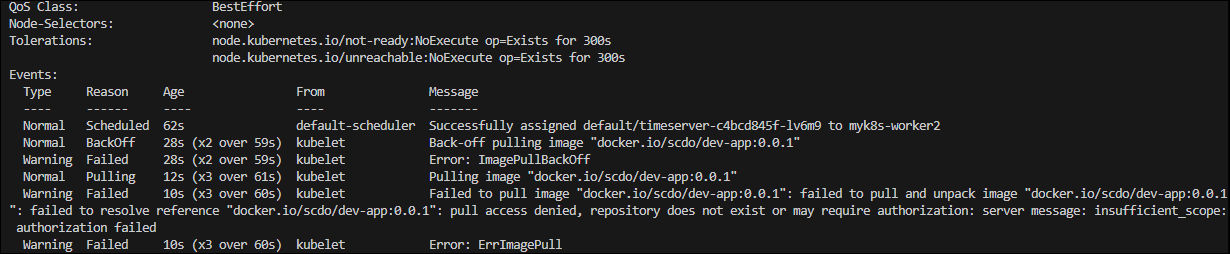
이 에러는 k8s가 컨테이너 이미지를 가져오지 못할 때 발생하는데 주로 다음과 같은 원인으로 발생합니다.
- 이미지 이름 오타 또는 존재하지 않는 이미지일 때 발생
- 자격 증명 누락으로 프라이빗 레지스트리에 접근하지 못하는 경우도 있음
- 이미지 이름과 경로를 정확히 입력했는지 확인하고, 필요한 경우 imagePullSecrets를 설정해야 함
# 전체 네임스페이스의 Secret 확인
kubectl get secret -A
# 변수 설정
DHUSER=<도커 허브 계정>
DHPASS=<도커 허브 암호 혹은 토큰>
echo $DHUSER $DHPASS

# Docker 자격 증명 Secret 생성 (타입: docker-registry)
kubectl create secret docker-registry dockerhub-secret \
  --docker-server=https://index.docker.io/v1/ \
  --docker-username=$DHUSER \
  --docker-password=$DHPASS

# 확인
kubectl get secret
kubectl describe secret
kubectl get secrets -o yaml | kubectl-neat

# 변수 설정
SECRET=<base64 인코딩 값>
echo "$SECRET" | base64 -d ; echo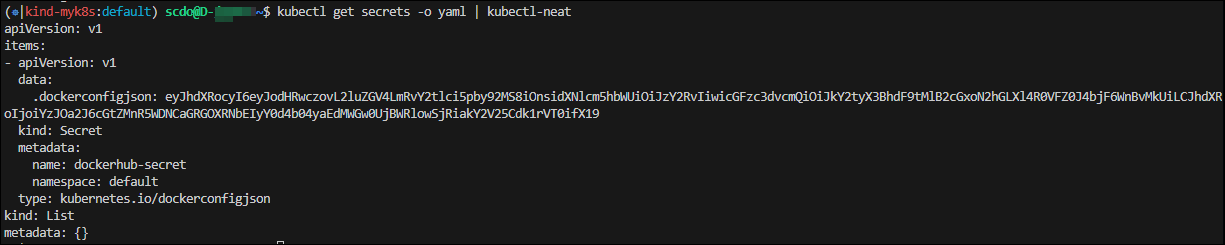
# 디플로이먼트 오브젝트 업데이트 : 시크릿 적용 >> 아래 도커 계정 부분만 변경해서 배포해보자
cat <<EOF | kubectl apply -f -
apiVersion: apps/v1
kind: Deployment
metadata:
  name: timeserver
spec:
  replicas: 2
  selector:
    matchLabels:
      pod: timeserver-pod
  template:
    metadata:
      labels:
        pod: timeserver-pod
    spec:
      containers:
      - name: timeserver-container
        image: docker.io/$DHUSER/dev-app:0.0.1
        livenessProbe:
          initialDelaySeconds: 30
          periodSeconds: 30
          httpGet:
            path: /healthz
            port: 80
            scheme: HTTP
          timeoutSeconds: 5
          failureThreshold: 3
          successThreshold: 1
      imagePullSecrets:
      - name: dockerhub-secret
EOF
# 다른 터미널에서
watch -d kubectl get deploy,rs,pod -o wide
# 확인
kubectl get events -w --sort-by '.lastTimestamp'
kubectl get deploy,pod
# 접속을 위한 curl 파드 생성
kubectl run curl-pod --image=curlimages/curl:latest --command -- sh -c "while true; do sleep 3600; done"
kubectl get pod -owide
# timeserver 파드 IP 1개 확인 후 접속 확인
PODIP1=<timeserver-Y 파드 IP>
# # curl-pod 내부에서 첫 번째 파드(PODIP1)로 요청
kubectl exec -it curl-pod -- curl $PODIP1
kubectl exec -it curl-pod -- curl $PODIP1/healthz
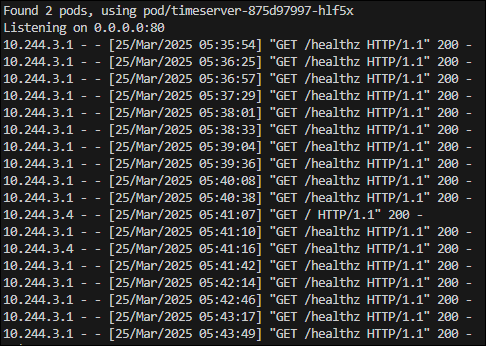
# 로그 확인
kubectl logs deploy/timeserver
kubectl logs deploy/timeserver -f
kubectl stern deploy/timeserver
kubectl stern -l pod=timeserver-pod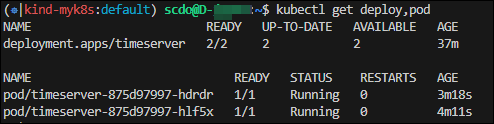


파드 1개 삭제 후 동작(접속) 확인
# 변수 설정
POD1NAME=<파드 1개 이름?

# 파드 1개 삭제
kubectl get pod -owide
kubectl delete pod $POD1NAME && kubectl get pod -w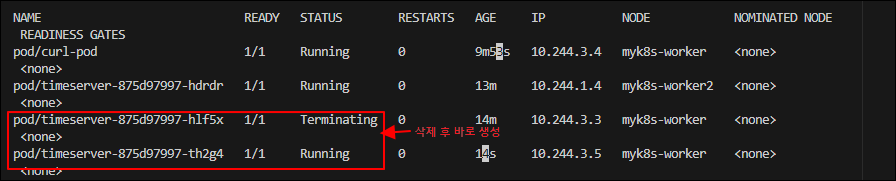
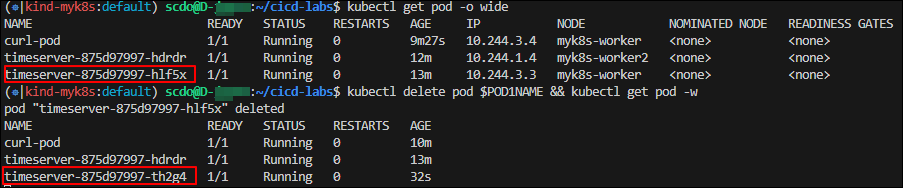
Kubernetes는 파드가 삭제되면 셀프 힐링 기능으로 다시 생성됩니다. 새로 생성된 파드는 IP가 변경되므로 IP로 직접 접근하면 안정적이지 않기 때문에 고정된 접근 지점이 필요하며 이를 위해 Service 리소스를 사용해야 합니다.
k8s에서 Service가 필요한 이유
- 파드는 클러스터 내부에서만 사용할 수 있는 고유한 IP를 가지며 삭제되거나 재생성되면 IP가 변경됩니다. 따라서 파드의 IP를 직접 사용하는 방식은 안정적이지 않습니다.
- 파드를 외부에 직접 노출할 수는 있지만 이는 특수한 경우에만 사용되며 일반적으로는 권장되지 않습니다.
- 디플로이먼트를 사용할 때에도 파드를 Service로 묶어 단일한 접근 지점을 제공하는 것이 일반적인 방법입니다.
- Service는 로드 밸런싱 기능을 제공하여 여러 파드에 트래픽을 안정적으로 분산시킬 수 있습니다.
- 디플로이먼트에서 지정한 파드 수가 항상 유지되는 것은 아니기 때문에 Service를 통해 현재 실행 중인 파드로만 트래픽을 전달할 수 있습니다.
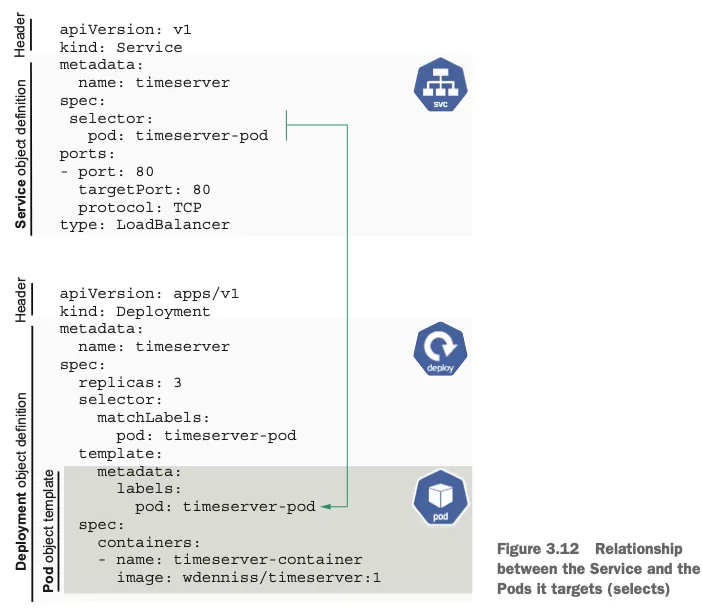
- Service는 디플로이먼트를 직접 참조하지 않으며 특정 레이블을 기준으로 파드와 연결됩니다. 이 연결은 selector 항목을 통해 설정됩니다.
- 각 파드와 Service는 고유한 클러스터 내부 IP를 가지므로 포트 충돌 없이 여러 애플리케이션 간의 안정적인 통신이 가능합니다.
# 서비스 생성
cat <<EOF | kubectl apply -f -
apiVersion: v1
kind: Service
metadata:
  name: timeserver
spec:
  selector:
    pod: timeserver-pod
  ports:
  - port: 80
    targetPort: 80
    protocol: TCP
    nodePort: 30000
  type: NodePort
EOF
# 확인
kubectl get service,ep timeserver -owide
# Service(ClusterIP)로 접속 확인 : 도메인네임, ClusterIP
kubectl exec -it curl-pod -- curl timeserver
kubectl exec -it curl-pod -- curl timeserver/healthz
kubectl exec -it curl-pod -- curl $(kubectl get svc timeserver -o jsonpath={.spec.clusterIP})
# Service(NodePort)로 접속 확인 "노드IP:NodePort"
curl http://127.0.0.1:30000
curl http://127.0.0.1:30000
curl http://127.0.0.1:30000/healthz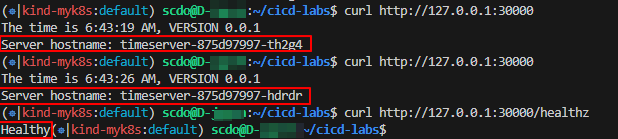
# 반복 접속 해두기 : 부하분산 확인
while true; do curl -s --connect-timeout 1 http://127.0.0.1:30000 ; sleep 1 ; done
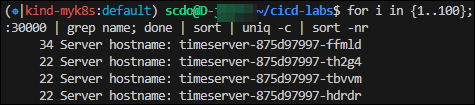
for i in {1..100}; do curl -s http://127.0.0.1:30000 | grep name; done | sort | uniq -c | sort -nr# 파드 복제본 증가 : service endpoint 대상에 자동 추가
kubectl scale deployment timeserver --replicas 4
kubectl get service,ep timeserver -owide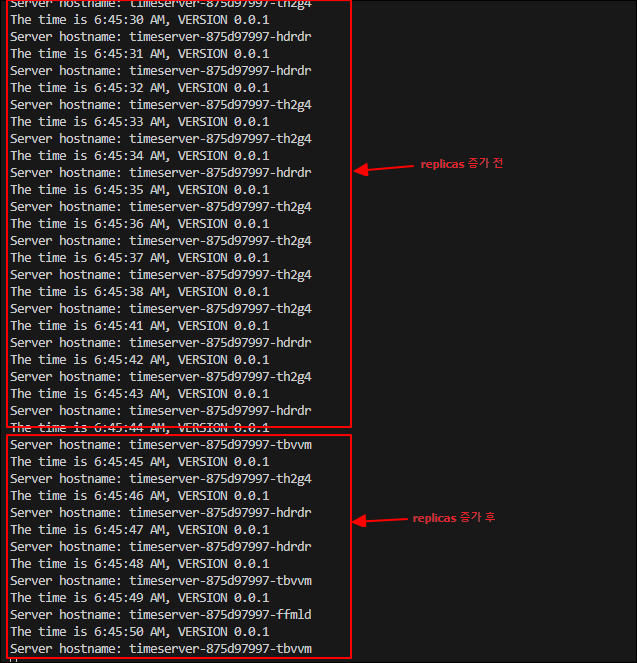

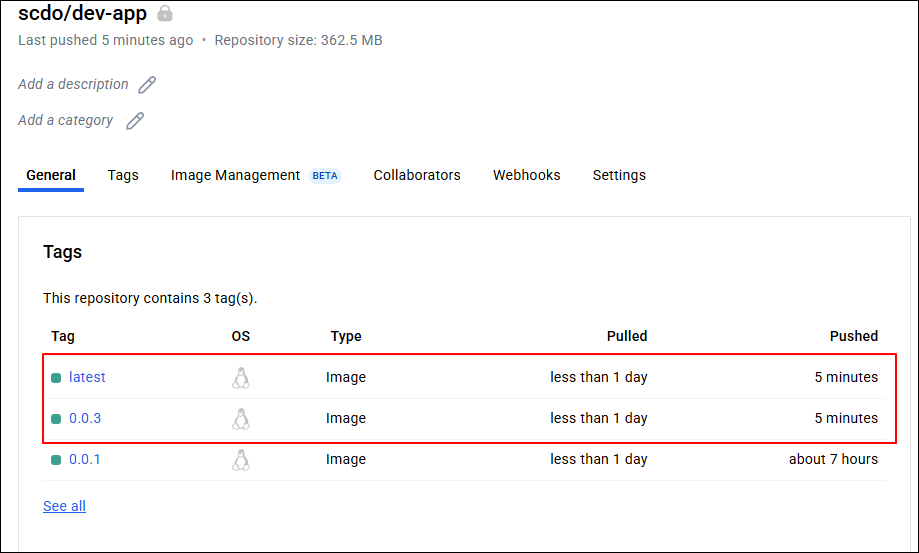
애플리케이션 업데이트
샘플 애플리케이션인 server.py 파일을 수정하고, VERSION 파일의 값을 0.0.2로 업데이트합니다. 이후 변경된 내용을 Git 저장소에 commit하고 push하면 Jenkins가 자동으로 빌드를 실행합니다.
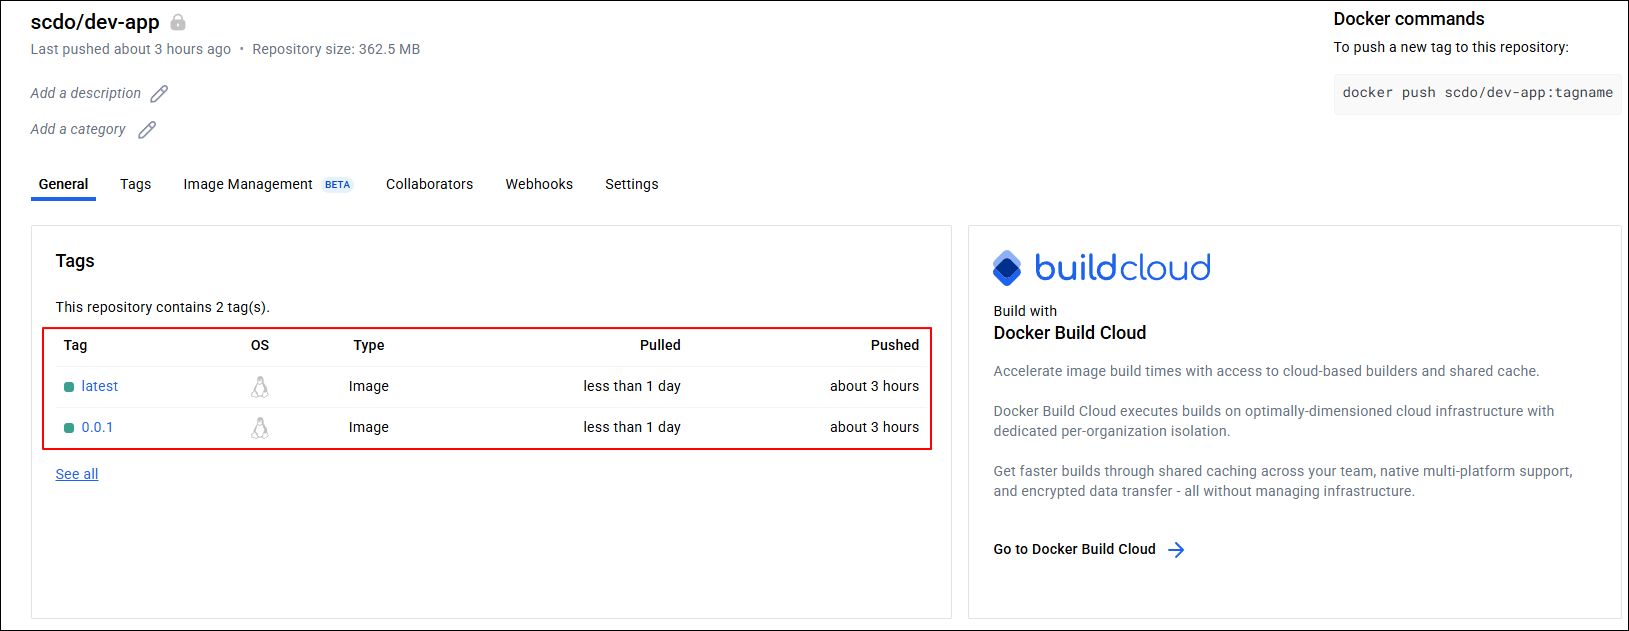
이때 Jenkins는 새로운 0.0.2 태그를 기반으로 컨테이너 이미지를 빌드하여 Docker Hub에 푸시하면 k8s의 Deployment가 이 새로운 이미지를 사용하도록 업데이트됩니다.
# VERSION 변경 : 0.0.2
# server.py 변경 : 0.0.2
git add . && git commit -m "VERSION $(cat VERSION) Changed" && git push -u origin main
# 파드 복제본 증가
kubectl scale deployment timeserver --replicas 4
kubectl get service,ep timeserver -owide
# 애플리케이션의 컨테이너 이미지 교체
# 0.0.Y는 교체할 버전으로 변경
kubectl set image deployment timeserver timeserver-container=$DHUSER/dev-app:0.0.Y && watch -d "kubectl get deploy,ep timeserver; echo; kubectl get rs,pod"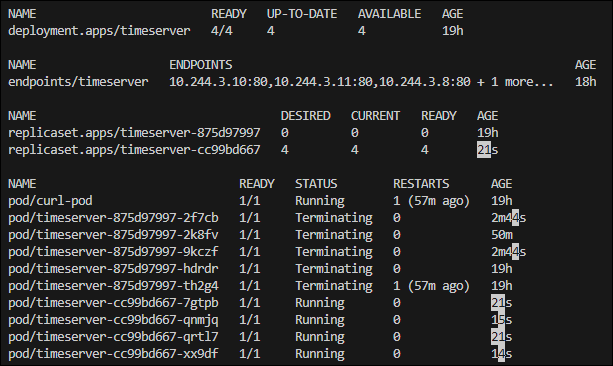
# kubectl get deploy $DEPLOYMENT_NAME
kubectl get deploy timeserver
kubectl get pods -l pod=timeserver-pod

# 확인
curl http://127.0.0.1:30000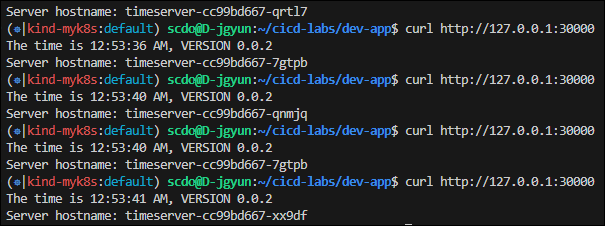
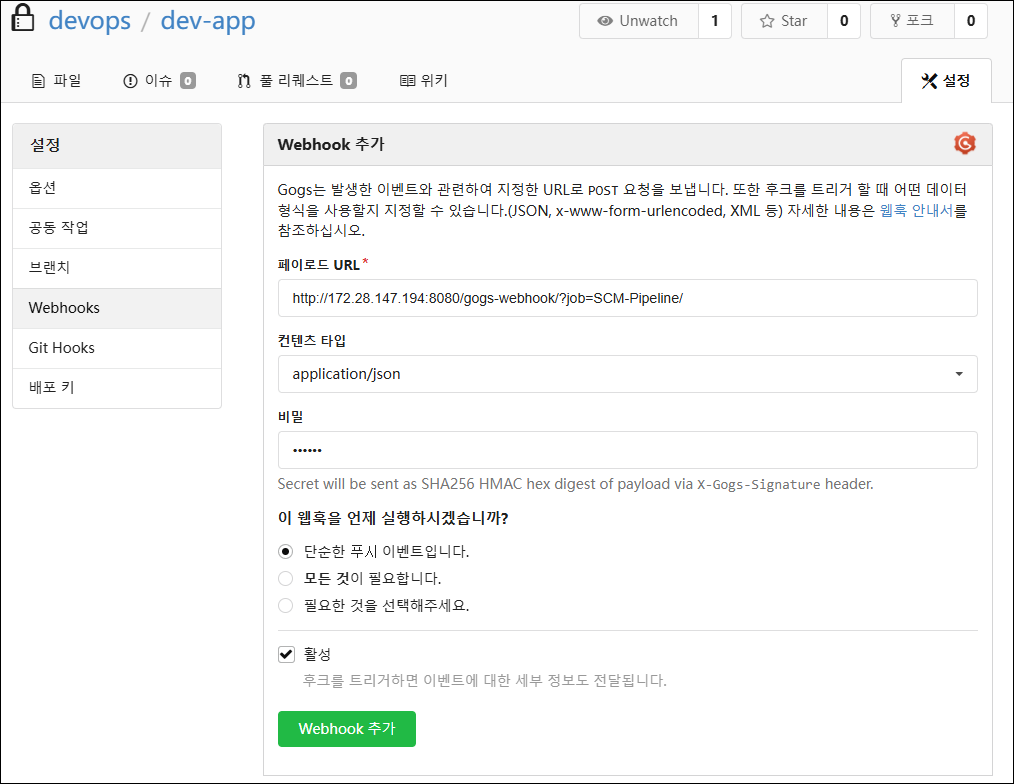
Webhook 설정
Git(gogs) 저장소에서 코드가 푸시될 때 Jenkins에 자동으로 알려서 빌드를 실행하기 위해 Webhook 설정을 진행합니다.
# gogs 에 /data/gogs/conf/app.ini 파일 수정 후 컨테이너 재기동
[security]
INSTALL_LOCK = true
SECRET_KEY   = j2xaUPQcbAEwpIu
# 각자 자신의 PC IP , Windows (WSL2) 사용자는 자신의 WSL2 Ubuntu eth0 IP
LOCAL_NETWORK_ALLOWLIST = <자신의 IP>
gogs → dev-app repo → 설정 → Webhooks
Jenkins → 새로운 Item → Pipeline
GitHub project : http://<자신의 IKP>:3000/<Gogs 계정명>/dev-app # .git 은 제거
Use Gogs secret : <계정 패스워드>
Build Triggers : Build when a change is pushed to Gogs 체크
Pipeline script from SCM
 - SCM : Git
  - Repo URL(`http://<mac IP>:3000/<Gogs 계정명>/dev-app`)
  - Credentials(devops/)
  - Branch(/main)
 - Script Path : Jenkinsfile
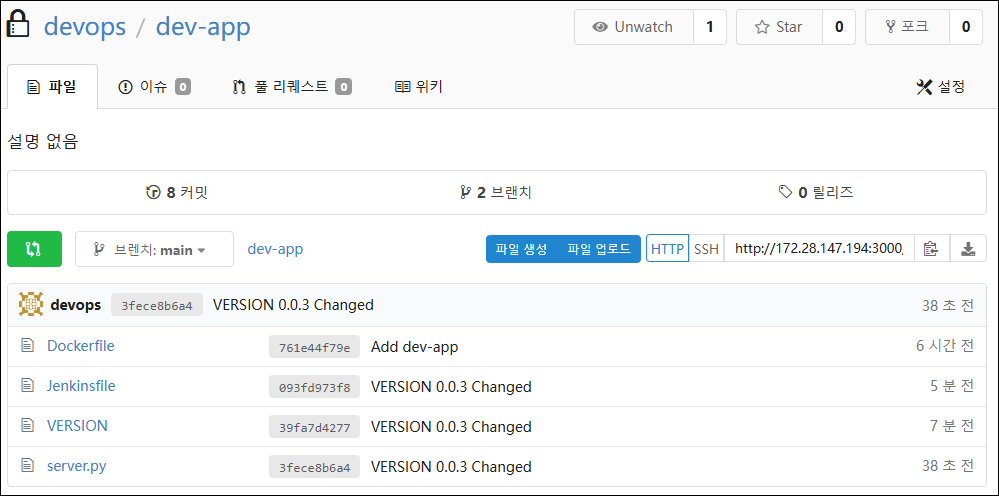
Jenkinsfile 작성 후 Git Push
# Jenkinsfile 빈 파일 작성
touch Jenkinsfile

# VERSION 파일 : 0.0.3 수정
# server.py 파일 : 0.0.3 수정
# Jenkinsfile 작성
pipeline {
agent any
environment {
DOCKER_IMAGE = '<자신의 도커 허브 계정>/dev-app' // Docker 이미지 이름
}
stages {
stage('Checkout') {
steps {
git branch: 'main',
url: 'http://<자신의 집 IP>:3000/devops/dev-app.git', // Git에서 코드 체크아웃
credentialsId: 'gogs-crd' // Credentials ID
}
}
stage('Read VERSION') {
steps {
script {
// VERSION 파일 읽기
def version = readFile('VERSION').trim()
echo "Version found: ${version}"
// 환경 변수 설정
env.DOCKER_TAG = version
}
}
}
stage('Docker Build and Push') {
steps {
script {
docker.withRegistry('https://index.docker.io/v1/', 'dockerhub-crd') {
// DOCKER_TAG 사용
def appImage = docker.build("${DOCKER_IMAGE}:${DOCKER_TAG}")
appImage.push()
appImage.push("latest")
}
}
}
}
}
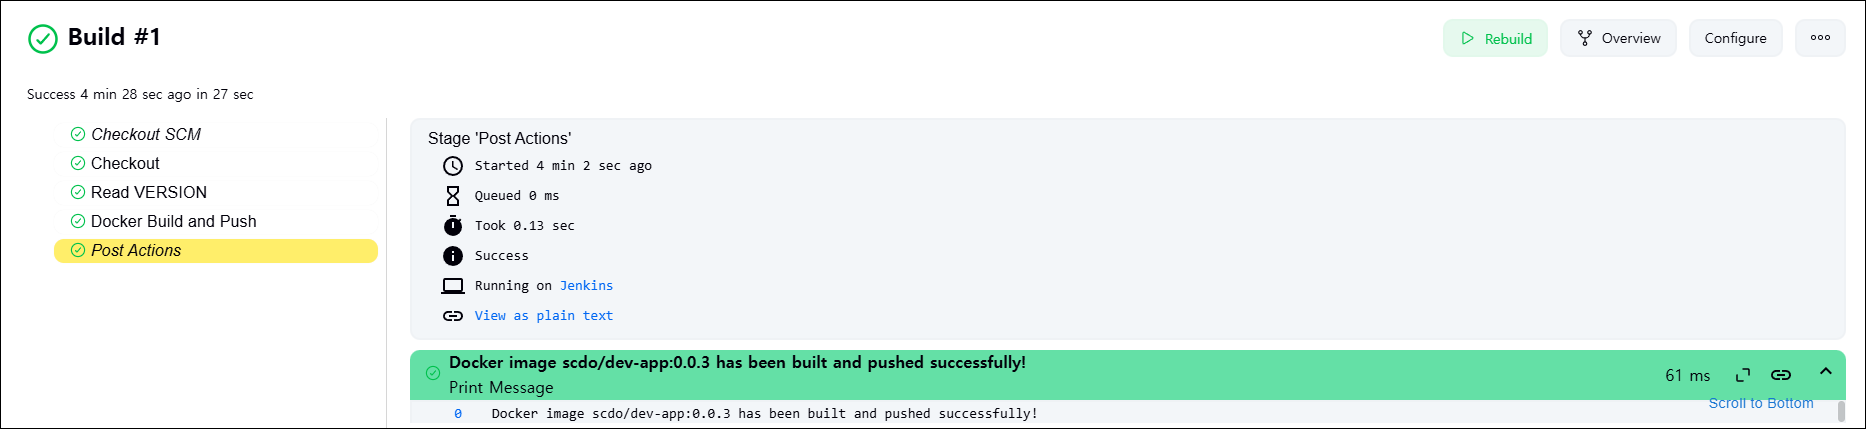
post {
success {
echo "Docker image ${DOCKER_IMAGE}:${DOCKER_TAG} has been built and pushed successfully!"
}
failure {
echo "Pipeline failed. Please check the logs."
}
}
}git add . && git commit -m "VERSION $(cat VERSION) Changed" && git push -u origin main
Jenkins CI/CD + K8S(Kind)
먼저 Jenkins 컨테이너 내부에 kubectl과 helm을 설치해줍니다.
# Install kubectl, helm
docker compose exec --privileged -u root jenkins bash
--------------------------------------------
#curl -LO "https://dl.k8s.io/release/v1.32.2/bin/linux/amd64/kubectl"
curl -LO "https://dl.k8s.io/release/$(curl -L -s https://dl.k8s.io/release/stable.txt)/bin/linux/arm64/kubectl"  # macOS
curl -LO "https://dl.k8s.io/release/$(curl -L -s https://dl.k8s.io/release/stable.txt)/bin/linux/amd64/kubectl"  # WindowOS

install -o root -g root -m 0755 kubectl /usr/local/bin/kubectl
kubectl version --client=true

# 헬름 설치
curl https://raw.githubusercontent.com/helm/helm/main/scripts/get-helm-3 | bash
helm version

exit
--------------------------------------------
# 컨테이너에 정상적으로 설치되어 있는지 확인
docker compose exec jenkins kubectl version --client=true
docker compose exec jenkins helm version
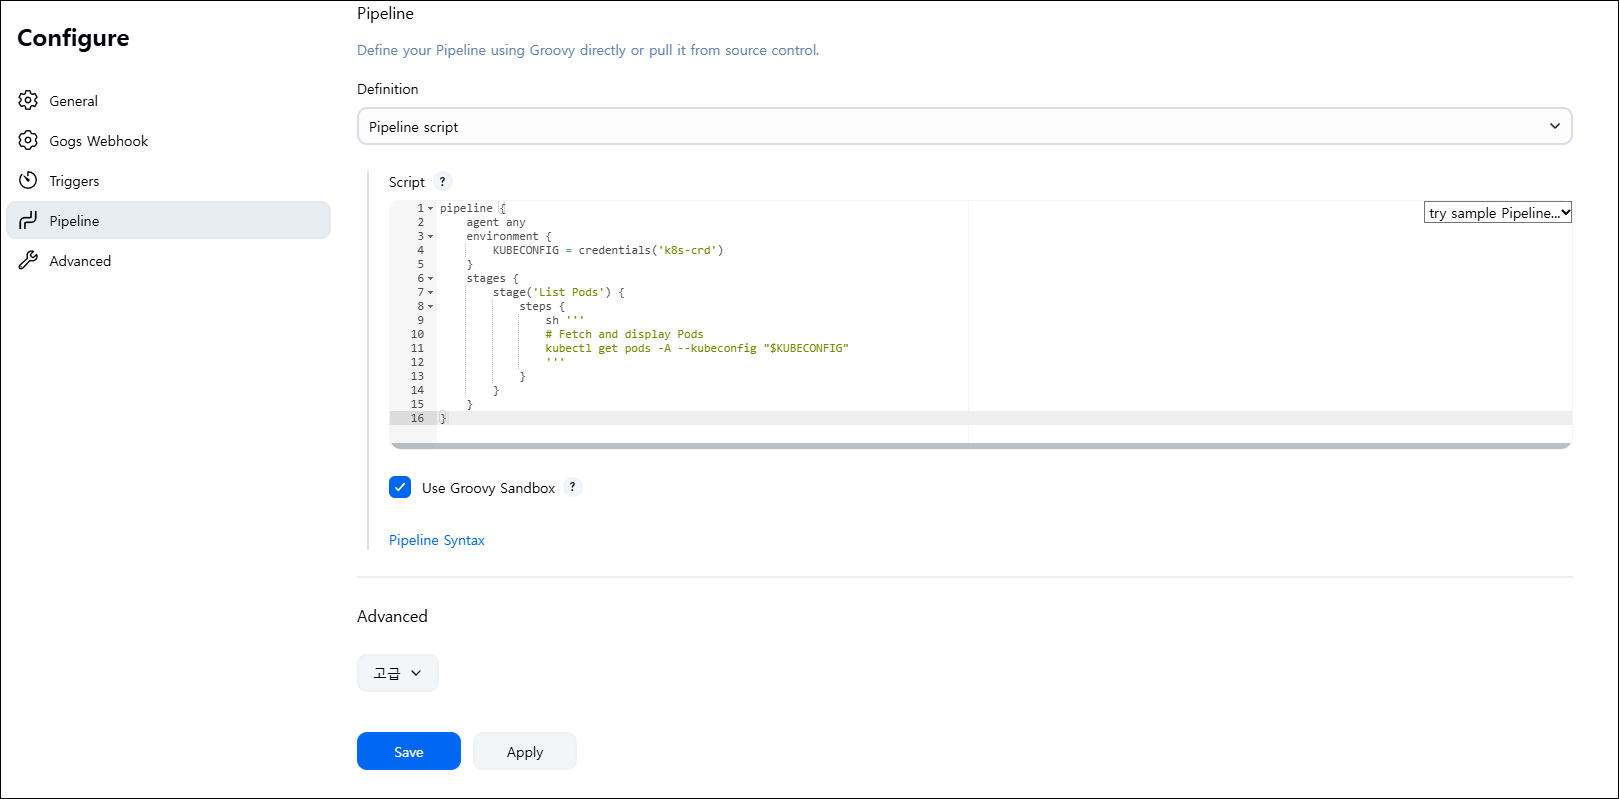
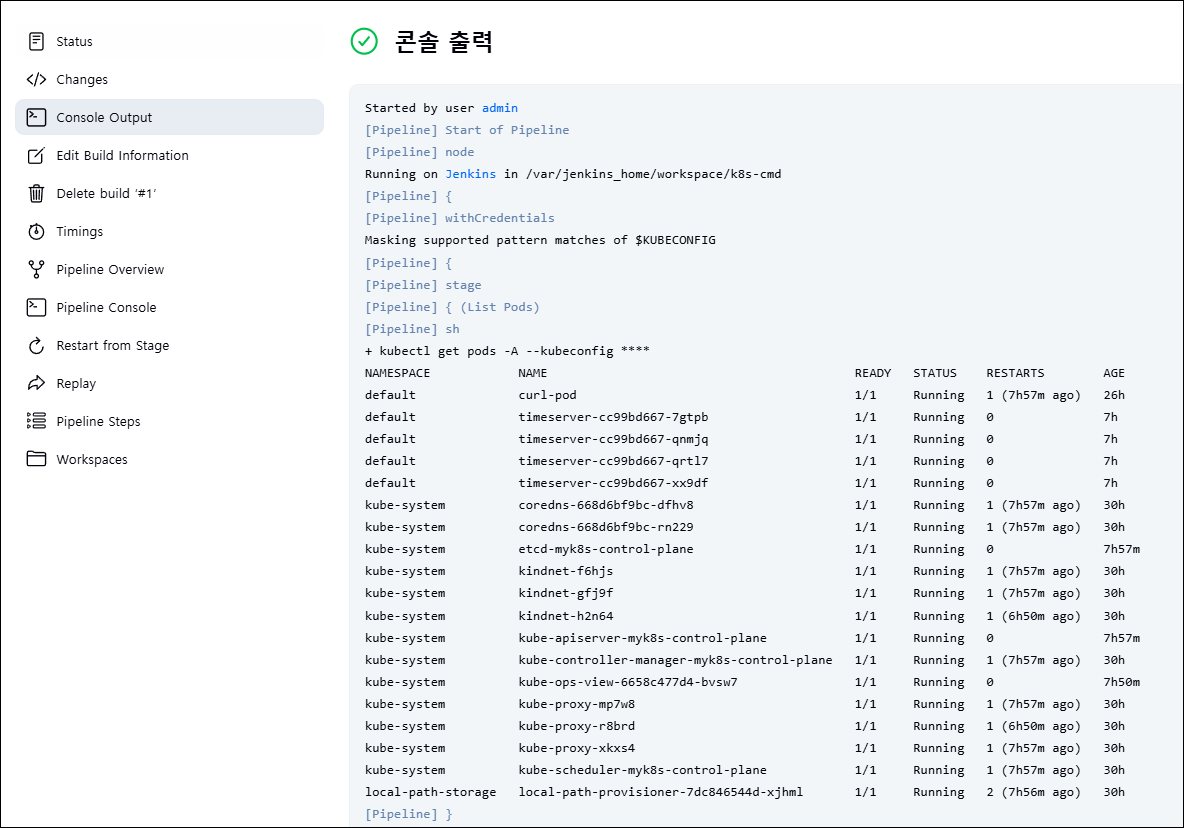
정상적으로 동작하는지 확인하기 위해 Jenkins에서 테스트용 Item을 생성 후 콘솔 로그를 확인해봅니다.
pipeline {
    agent any
    environment {
        KUBECONFIG = credentials('k8s-crd')
    }
    stages {
        stage('List Pods') {
            steps {
                sh '''
                # Fetch and display Pods
                kubectl get pods -A --kubeconfig "$KUBECONFIG"
                '''
            }
        }
    }
}
실습
Jenkins를 이용한 blue-green 배포 준비
# dev-app 디렉토리로 이동
cd dev-app

# 디렉토리 생성
mkdir deploy
cat > deploy/echo-server-blue.yaml <<EOF
apiVersion: apps/v1
kind: Deployment
metadata:
name: echo-server-blue
spec:
replicas: 2
selector:
matchLabels:
app: echo-server
version: blue
template:
metadata:
labels:
app: echo-server
version: blue
spec:
containers:
- name: echo-server
image: hashicorp/http-echo
args:
- "-text=Hello from Blue"
ports:
- containerPort: 5678
EOF
cat > deploy/echo-server-service.yaml <<EOF
apiVersion: v1
kind: Service
metadata:
name: echo-server-service
spec:
selector:
app: echo-server
version: blue
ports:
- protocol: TCP
port: 80
targetPort: 5678
nodePort: 30000
type: NodePort
EOF
cat > deploy/echo-server-green.yaml <<EOF
apiVersion: apps/v1
kind: Deployment
metadata:
name: echo-server-green
spec:
replicas: 2
selector:
matchLabels:
app: echo-server
version: green
template:
metadata:
labels:
app: echo-server
version: green
spec:
containers:
- name: echo-server
image: hashicorp/http-echo
args:
- "-text=Hello from Green"
ports:
- containerPort: 5678
EOF# Push
tree
git add . && git commit -m "Add echo server yaml" && git push -u origin main# 기존 서비스 삭제 후 apply
cd deploy
kubectl delete deploy,svc --all
kubectl apply -f .
# 확인
kubectl get deploy,svc,ep -owide
curl -s http://127.0.0.1:30000
# selector 수정(blue -> green)
kubectl patch svc echo-server-service -p '{"spec": {"selector": {"version": "green"}}}'
kubectl get deploy,svc,ep -owide
curl -s http://127.0.0.1:30000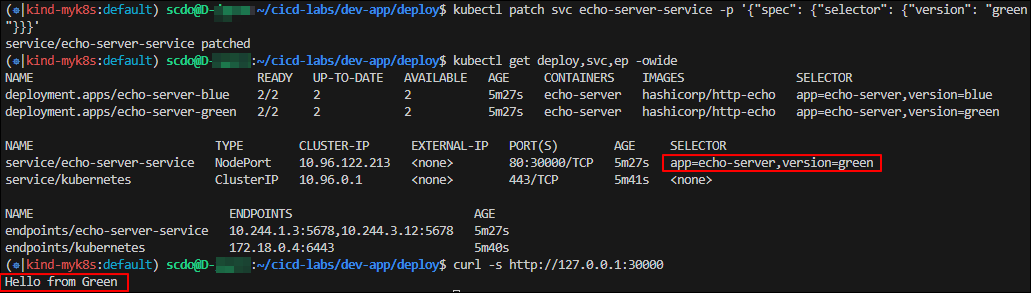
# selector를 다시 수정(green -> blue)
kubectl patch svc echo-server-service -p '{"spec": {"selector": {"version": "blue"}}}'
kubectl get deploy,svc,ep -owide
curl -s http://127.0.0.1:30000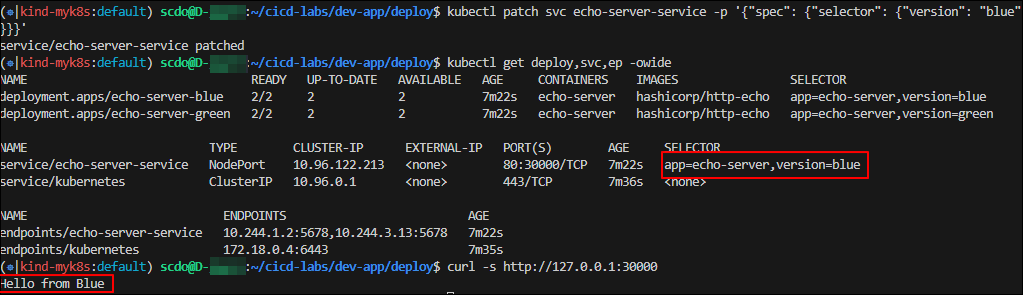
Jenkins 이용한 k8s 기본 배포
# pipeline script
pipeline {
    agent any

    environment {
        KUBECONFIG = credentials('k8s-crd')
    }

    stages {
        stage('Checkout') {
            steps {
                 git branch: 'main',
                 url: 'http://<자신의 집 IP>:3000/devops/dev-app.git',  // Git에서 코드 체크아웃
                 credentialsId: 'gogs-crd'  // Credentials ID
            }
        }

        stage('container image build') {
            steps {
                echo "container image build"
            }
        }

        stage('container image upload') {
            steps {
                echo "container image upload"
            }
        }

        stage('k8s deployment blue version') {
            steps {
                sh "kubectl apply -f ./deploy/echo-server-blue.yaml --kubeconfig $KUBECONFIG"
                sh "kubectl apply -f ./deploy/echo-server-service.yaml --kubeconfig $KUBECONFIG"
            }
        }

        stage('approve green version') {
            steps {
                input message: 'approve green version', ok: "Yes"
            }
        }

        stage('k8s deployment green version') {
            steps {
	        	sh "kubectl apply -f ./deploy/echo-server-green.yaml --kubeconfig $KUBECONFIG"
            }
        }

        stage('approve version switching') {
            steps {
                script {
                    returnValue = input message: 'Green switching?', ok: "Yes", parameters: [booleanParam(defaultValue: true, name: 'IS_SWITCHED')]
                    if (returnValue) {
                        sh "kubectl patch svc echo-server-service -p '{\"spec\": {\"selector\": {\"version\": \"green\"}}}' --kubeconfig $KUBECONFIG"
                    }
                }
            }
        }

        stage('Blue Rollback') {
            steps {
                script {
                    returnValue = input message: 'Blue Rollback?', parameters: [choice(choices: ['done', 'rollback'], name: 'IS_ROLLBACk')]
                    if (returnValue == "done") {
                        sh "kubectl delete -f ./deploy/echo-server-blue.yaml --kubeconfig $KUBECONFIG"
                    }
                    if (returnValue == "rollback") {
                        sh "kubectl patch svc echo-server-service -p '{\"spec\": {\"selector\": {\"version\": \"blue\"}}}' --kubeconfig $KUBECONFIG"
                    }
                }
            }
        }
    }
}
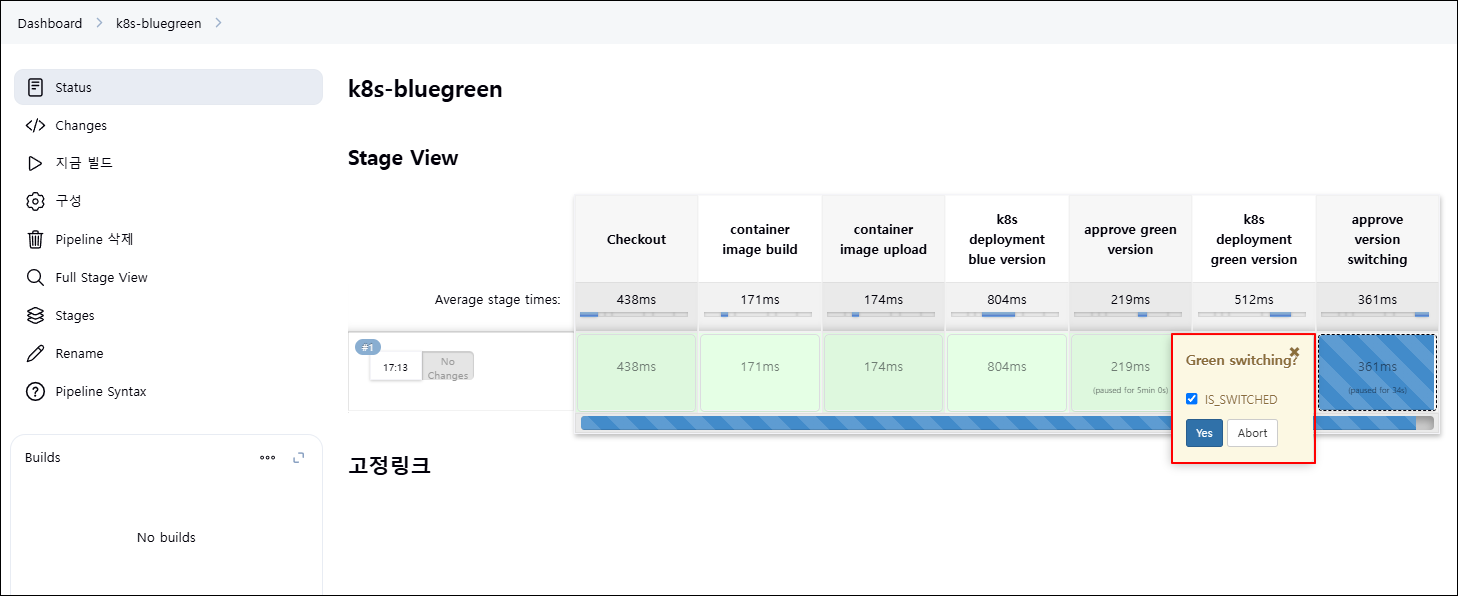
이제 빌드를 하면 되는데 빌드 진행 중 blue 버전이 먼저 배포된 상태에서 green 버전을 배포할지 여부가 나오는데 yes를 눌러 다음 단계로 진행합니다.
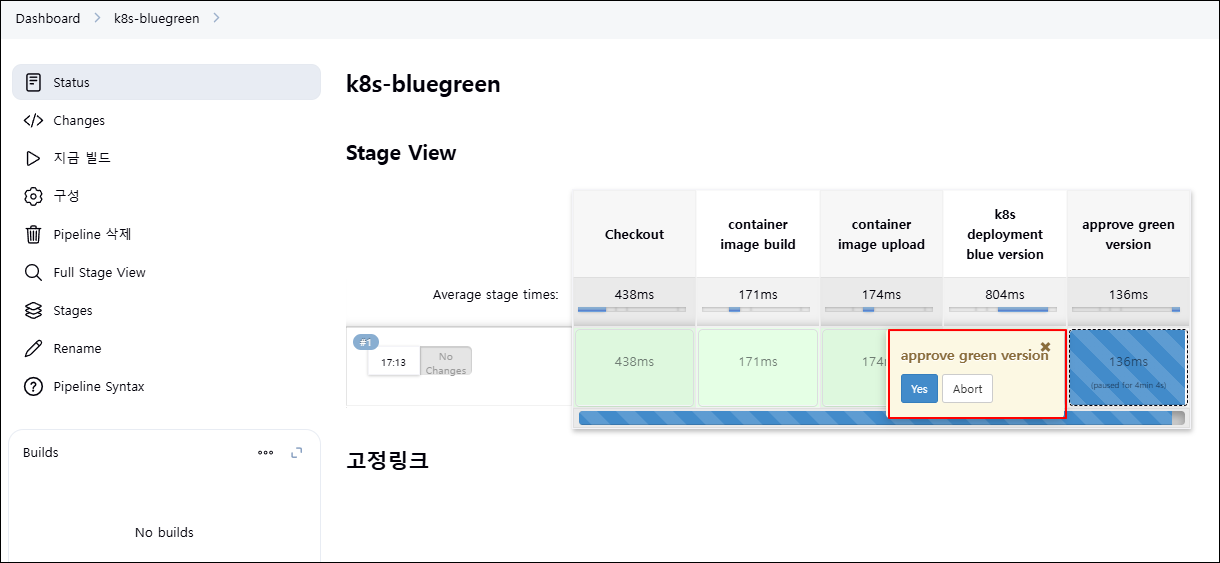
green 버전이 배포된 뒤 서비스 전환을 위한 승인 단계가 진행되는데, yes를 눌러 서비스 트래픽을 green 버전으로 전환합니다.
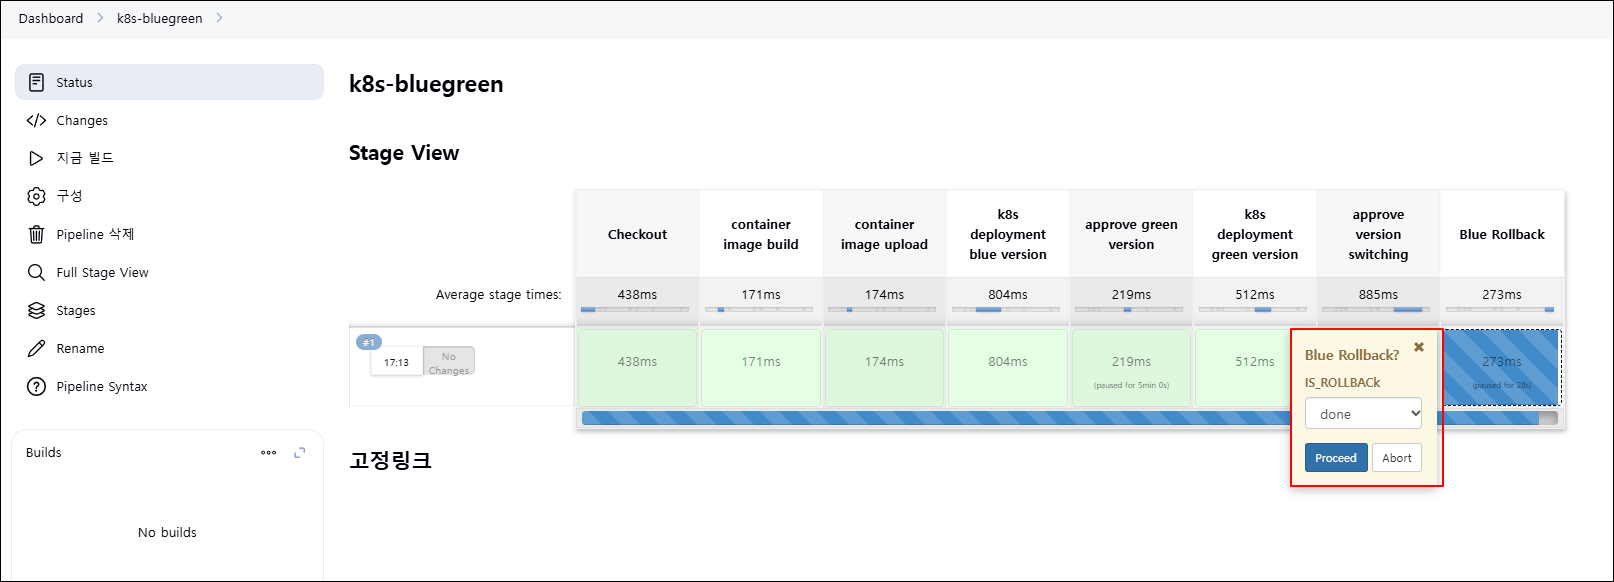
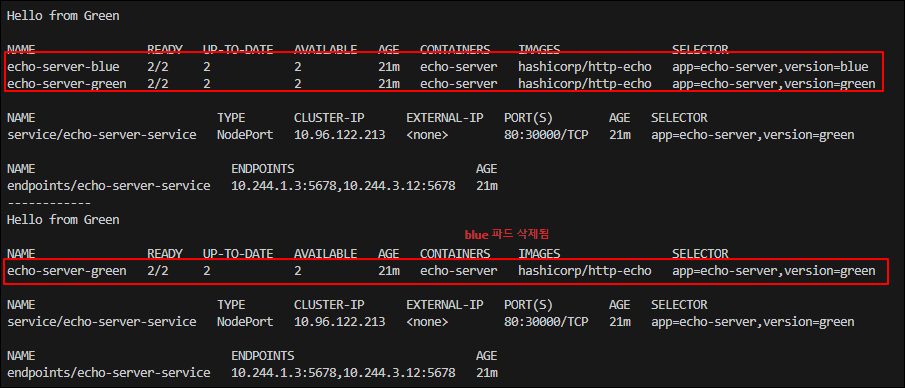
green 버전으로 서비스가 전환된 뒤 최종 단계에서 blue 버전에 대한 처리 단계가 나오는데 done 선택하여 blue 버전을 제거하였습니다.(rollback 선택 시 다시 blue 버전으로 rollback 됨)

Jenkins는 kubectl, helm 같은 명령어 기반 배포에는 유연하지만 k8s 상태 추적이나 선언형 배포 자동화에는 한계가 있습니다. 또한 rollbak, 전환 등도 수동 승인에 의존해 자동화 수준이 낮습니다.
이러한 한계를 극복하고 지속적이고 안정적인 배포 자동화를 위해 GitOps 기반의 운영 방식 도입을 고려할 수 있습니다.
'[AWS] > [EKS]' 카테고리의 다른 글
| 8주차 - K8S CI/CD (3) (0) | 2025.03.30 |
|---|---|
| 8주차 - K8S CI/CD (1) (1) | 2025.03.30 |
| 7주차 - EKS Mode/Node (0) | 2025.03.23 |
| 6주차 - EKS Security (0) | 2025.03.16 |
| 5주차 Study - Autoscaling (0) | 2025.03.09 |


